The following hints may assist you in your use of Power-Gx:
·Hovering the cursor over an icon will display a popup hint referred to as
a "tool tip". This is usually the name or function of the icon.
·In certain screens, hovering the cursor over part of the screen will
display a popup instruction line advising you what action to take in that
part of the screen.
·You can click the red in top right corner to close
a window, or the icon instead of the
button .
·You should always changes you make. The
button is used to abandon changes. Refer to the General Buttons and
Icons subchapter for a full list of the standard command buttons.
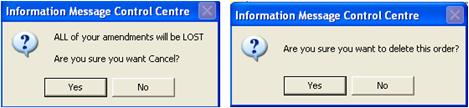
·You are often asked to confirm that you want to run a command. For
example if you choose to Delete a record or Close a window, you will
be presented with a popup window asking if you are sure you want to
continue with the action, allowing time to cancel if you change your
mind.
·You can use keyboard shortcuts instead of clicking on-screen icons
and buttons, e.g. Ctrl + C to copy highlighted text, F1 to open Power-Gx Help, Alt + Down Arrow to display options in drop-down menus etc.
The following website provides a list of standard Windows keyboard
shortcuts, some of which can be used in Power-Gx: http://support.microsoft.com/kb/301583 Click here to view the standard
keyboard layout if you are unsure where these keys are.
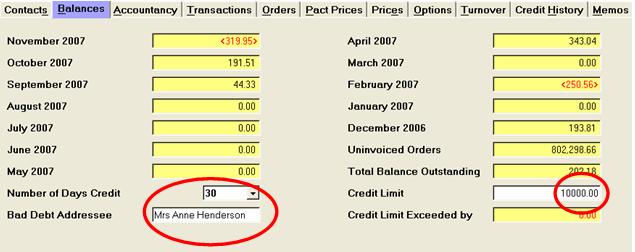
·You can hold down the Alt key and type the underlined letter on toolbar
options, menu options or command button to select
on option instead
of clicking it with the mouse. E.g. in the image below, Alt + S to open
the Contacts tab, Alt + B for the balances tab etc.
·In general, data fields that have a yellow background display
information which is set in another part of the system and cannot be
updated on this screen. Areas of the screen with a white background
indicate that you can update this field. The example below highlights
the three fields can be updated in this screen.
·If you have to select items from a list, e.g. customer accounts to include
in a report, holding down the Control key and clicking the required
items with the mouse allows you to select several accounts at once.
This way you only have to press the Add button once, instead of after
each item you select. If you hold the Shift key down, and select two
options from the list, it will select all the records between the first and
last ones you click.
·The F6 function key will copy the data from the cell above when you
are in a data entry screen such as entering supplier invoices and posting nominal journals. This save you time keying in information
such as the account code or posting date if it is the same as the row
above. Click here to view the standard keyboard layout
if you are
unsure where the F6 function key is.
·Where information is displayed in a spreadsheet like grid, you can click
a column heading to re-order the data alphabetically/chronologically by
that column. Clicking the column heading a second time will reverse
the sort on that column into reverse alphabet or chronological order.
·If you press the down cursor arrow anywhere on the last data entry line
in a a sales order or purchase order, the cursor is automatically taken
to the the first cell of the next free line.
·You can copy
and paste the period end checklist help topic into
Microsoft Word and edit the table to create your own checklist, specific
to the reports and routines you run at month end.
If you would like to share any tips you have for operating Power-Gx, please
email them to support@calidore.com


 in top right corner to close
a window, or the
in top right corner to close
a window, or the  icon instead of the
  button .
  changes you make. The
  button is used to abandon changes. Refer to the
General Buttons and
Icons subchapter for a full list of the standard command buttons.
button is used to abandon changes. Refer to the
General Buttons and
Icons subchapter for a full list of the standard command buttons.